Making your own Webpage
Steps to Making Your Own Custom Webpages
Hello Everyone!
I am glad that you have decided to start with your very own Webpages. I am going to try to teach you how to do that using "Our Family Website" that is run by the Joomla Content Management System (CMS).
Joomla is used for over 50% of the Websites on the internet, so if you can learn from me how to set-up and create your own webpages, then you will have a headstart in creating your own full Website and Joomla CMS one day if you would like.
Writing an Article in our website doesn't require this knowledge of the backend, if you want to just write an article within our website then just click on the link to "Write an Article" on the frontend. Then follow the instructions on how to add a menu, or you can leave all of that to me... Just do me a favor and fill out the "Submit your Webpage Wishes" form to let me know what your preferences are...
...all others please pay attention to this block of instruction.
Table of Contents
7. Outcome...
Logging in to Admin
Before creating content on our website you need to make a catagory that could be your name (best choice) or it could be named after the theme your writing about. Anyway we start out by Logging into the backend of the website...
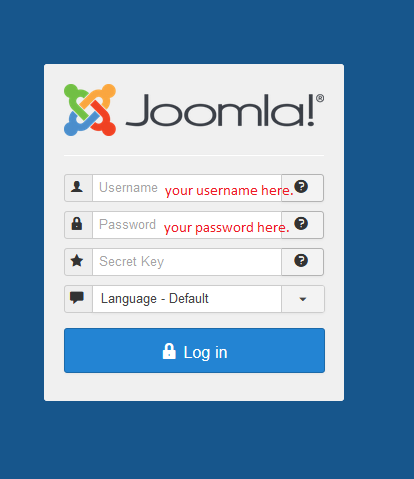
Making a Catagory
After you have done that then you will see this...

Click on the "Create an new Catagory" menu item then you should see something like this..

- New. Opens the editing screen to create a new category.
- Edit. Opens the editing screen for the selected category. If more than one category is selected (where applicable), only the first category will be opened. The editing screen can also be opened by clicking on the Name of the category.
- Publish. Makes the selected category available to visitors to your website.
- Unpublish. Makes the selected category unavailable to visitors to your website.
- Archive. Changes the status of the selected category to indicate that they are archived. Archived category can be moved back to the published or unpublished state by selecting "Archived" in the Select Status filter and changing the status of the category to Published or Unpublished as preferred.
- Trash. Changes the status of the selected category to indicate that they are trashed. Trashed category can still be recovered by selecting "Trashed" in the Select Status filter and changing the status of the category to Published or Unpublished as preferred. To permanently delete trashed category, select "Trashed" in the Select Status filter, select the category to be permanently deleted, then click the Empty Trash toolbar icon.
- Check-In. Checks-in the selected category. Works with one or multiple category selected.
Then click on the "New" button which will open the following...

- Title. This field has to be filled (see asterix). This is where you put the name of the catagory.
- Alias. Leave this field blank it is automatically filled by the system.
- Parent. Catagory. Please change the parent catagory to your family catagory.
- Published. Leave the catagory published.
- Access. This is the access level of the catagory. If you want the world te see it leave it public otherwise choose "family" or "registered".
After you are finished click the "Save and Close" button, then you are finished and have saved your first Joomla catagory.
To learn more about catagories and sub-catagories go to the Joomla Help pages.
Create your Own Content Item - Article
After you have logged in to the backend of the website you should see the following.

Click on the "Create an Article" menu item the following should open...

Then go ahead and click on the "New" button which opens the following pop-up...

Choose as Item type Article then you will be looking at the following...
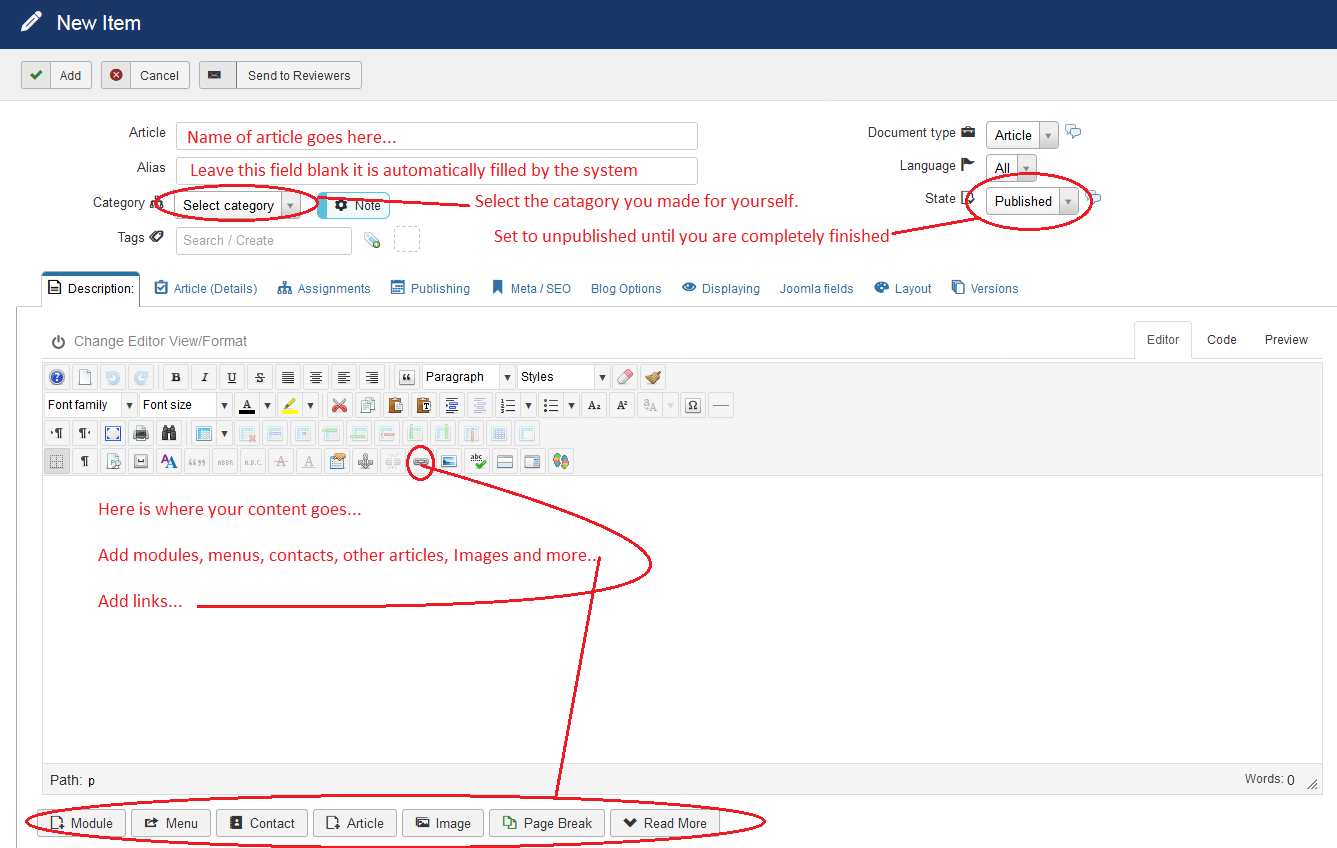
- Article. This is where the name of your article goes, and it is manditory to type something here so it will save.
- Alias. You can and should leave this field blank, the system will make its own alias.
- Catagory. Here is where you would choose the catagory that belongs to you. Or if it is relevent for another catagory then choose it instead.
- Tags. This is a nice little function that will allow for easier searching. Just type in keywords located in your article and hit the enter key.
- Document Type. Because you chose "Article" earlier this is the default setting, no need to change it.
- Language. Unless you can write in at least two different languages leave this one blank.
- State. Published is the default state. If you do not want anyone to see this article on the frontend until its finished then change it to unpublished.
- Description. As you can see in the picture above this is the part that is shown. This is the content that you want to show, and you can manipulate it how ever you feel.
Click on the "Add" button when you're finished. You don't have to finish the complete article here, once it is published you can edit it on the frontend.
To learn more about articles go to the Joomla Help pages.
Creating a Menu
After you have logged in to the backend of the website you should see the following.

Click on the "Make a new Menu" menu item then the next page will open...
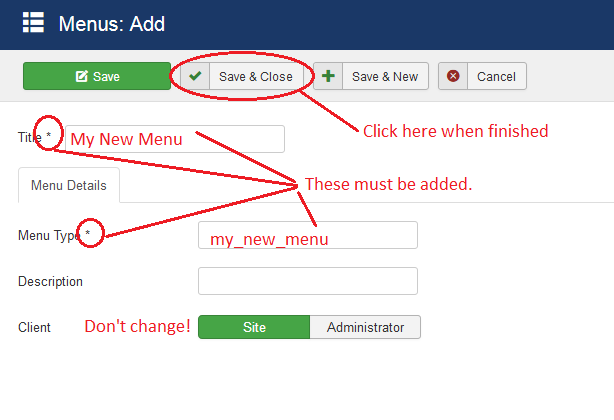
- Title. Type the name of the Menu in this field.
Menu Details
- Menu Type. Type a shorthand name with hyphens here.
- Description. This field doesn't need to be filled but it is better to add a decription for searching purposes.
- Client. Don't change this otherwise you will never see your article on the frontend.
Click the "Save and Close" button when finished. To learn more about menus and menu items go to the Joomla Help pages.
Create a Menu Item
After you have logged in to the backend of the website you should see the following.

Click on the "Make a menu item" menu item then the next page will open...

In the picture above only your new "My New Menu" menu is shown because I have typed "My New Menu" in the search field. Otherwise you will have to find and choose your menu out of the list. Once you have done that click on the menu and you should see the following page.

This is where we click on the "New" button to get to the next page...
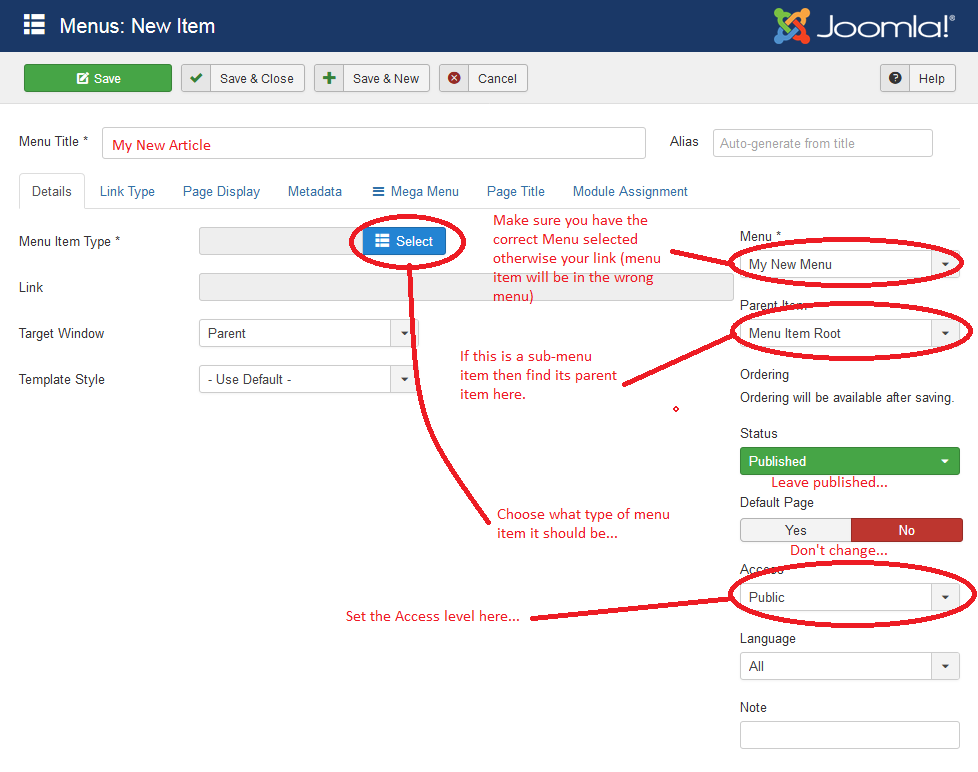
- Menu Title: The title of the menu item that will display in the menu.
- Alias: The Alias will be used in the SEF URL. Leave this blank and Joomla will fill in a default value from the title. This value will depend on the SEO settings (Global Configuration->Site). Using Unicode will produce UTF-8 aliases. You may also enter manually any UTF-8 character. Spaces and some forbidden characters will be changed to hyphens.When using default transliteration it will produce an alias in lower case and with dashes instead of spaces. You may enter the Alias manually. Use lowercase letters and hyphens (-). No spaces or underscores are allowed. Default value will be a date and time if the title is typed in non-latin letters .
Details
- Menu Item Type: The type of link: Component, URL, Alias, Separator, or Heading
- Link: Link for this menu
- Target Window: (Parent/New Window With Navigation/New Without Navigation). Target browser window when the menu item is selected.
- Template Style: (Use Default/Beez3 - Default/protostar - Default). Select a specific template style for this menu item or use the default template.
- Menu: (About Joomla/Australian Parks/Fruit Shop/Main Menu/Top/User Menu). Shows which menu a link will appear in.
- Parent Item: (Menu Item Root/Home/Site Map/Articles/Weblinks/Contacts/Login/...). Select a Parent Item
- Ordering: Ordering will be available after saving
- Status: (Published/Unpublished/Trashed). Set publication status.
- Default Page: (Yes/No). Sets this menu item as the default or home page of the site. You must have a default page set at all times.
- Access: (Guest/Public/Registered/Special/Customer Access Level (Example)). The access level group that is allowed to view this item.
- Language: (All/English (UK)). Assign a language to this menu item
- Note: Enter some text here
Link Type
Click on the "Select" button and the following pop-up will appear.
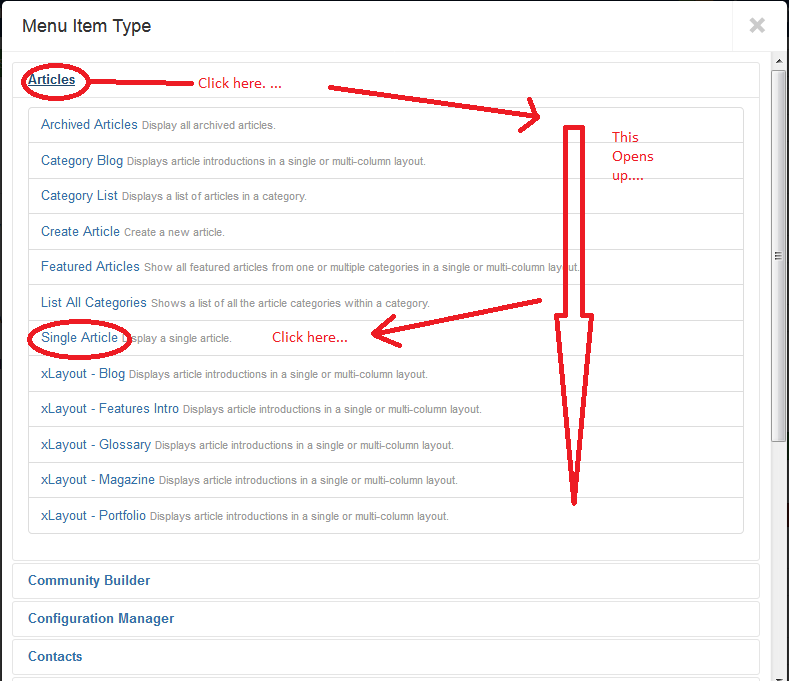
Select "Article" and then "Single Article" afterwhich the page will look different and you will be asked to choose which article will be linked...
The following pop-up will appear...
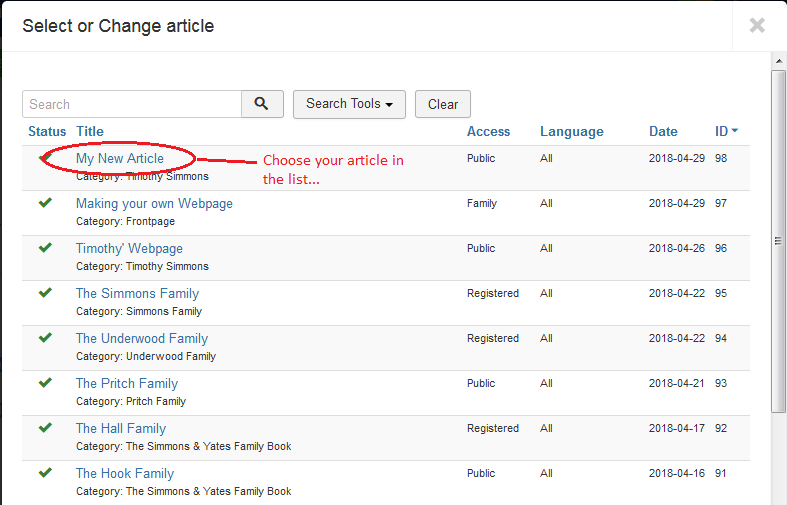
Just choose the article that you wrote then the page below will show...
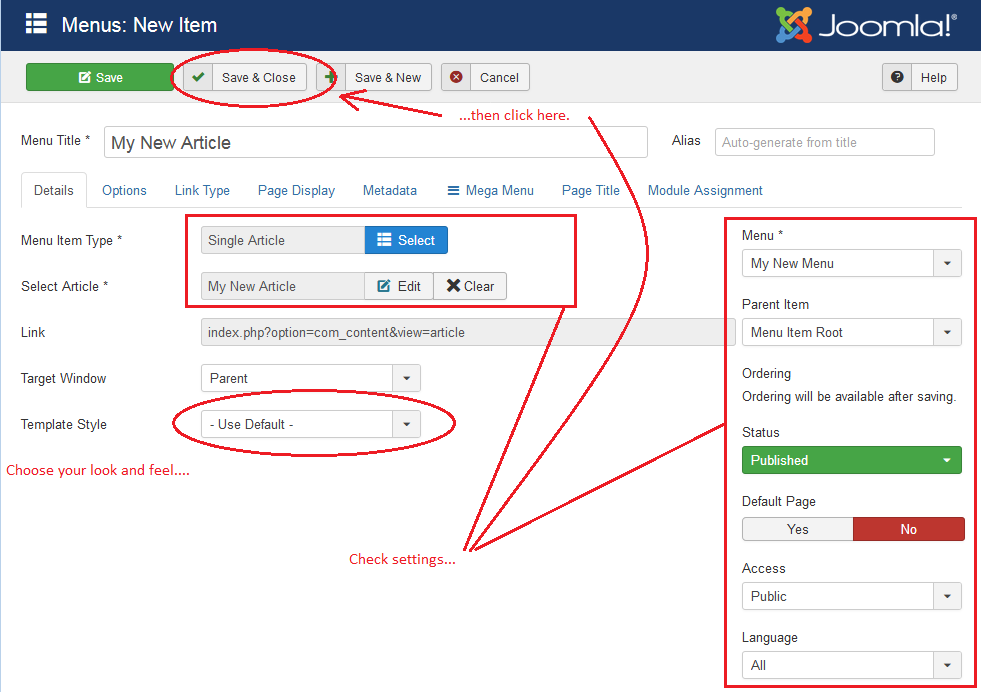
This is where you choose the template of the menu item ( this is the look of your article ). Check your settings and click on the "Save and Close" button. In order to ensure that there is a menu item on the homepage of our website you need to make a copy of the menu item and place it into the "Family Webpages" menu.
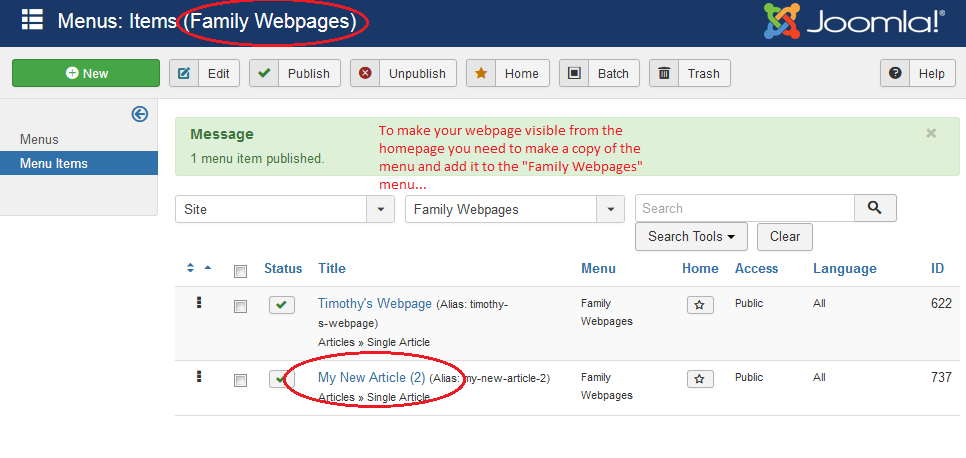
To learn more about menus and menu items go to the Joomla Help pages.
Creating and editing Modules
While creating a menu item above you should have see the following blue "Add a module for this menu" button.

Click on it to get to the "Add a module" page below...
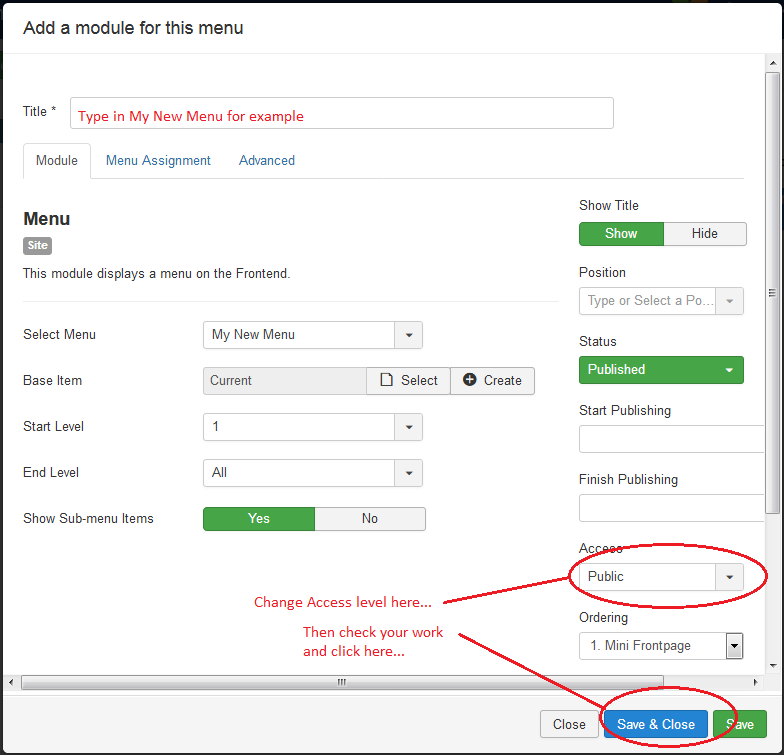
The title is mandatory so put in a name that suits you or just keep it simple an use the name of the menu that you created. Change the access level if you like. Make sure you have a valid postion chosen on the template that you chose earlier, otherwise you will see the article in the default template of the Website. At last click on the "Menu Assignment" next to see the following pop-up.
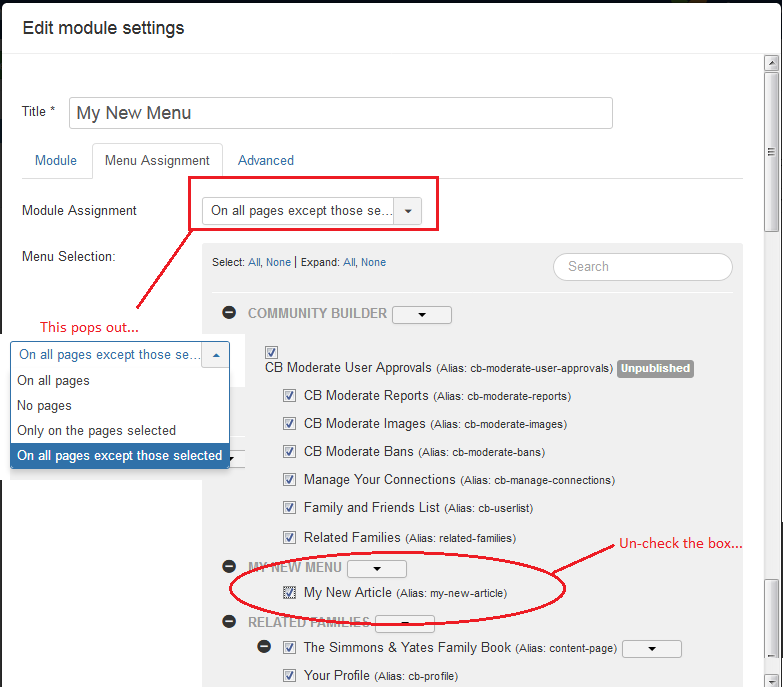
Choose a module assignment from the drop-down list ( I chose "On all pages exept those selected) because most are selected anyway when the list drops down. Now all that you do is find your article menu item an deselect or un-check the box so that it is the only page showing your module.
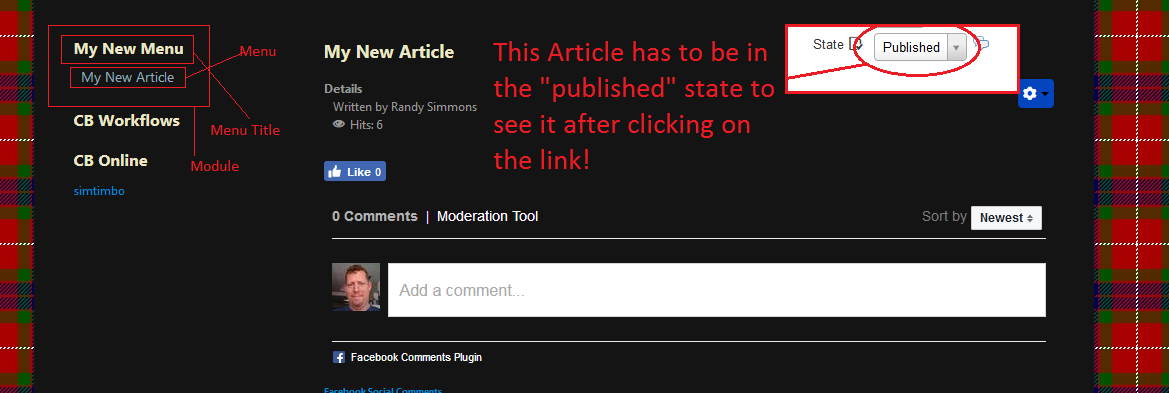
Above is an example of what the article looks like with the menu item template being set to "defaultarticletemplate(copy)," Notice how the complete look of the page has changed. Notice as well that your menu module is visible because the position of the module was set to a valid position. To learn more templates and module postions go to the Joomla Help pages.
-
Hits9209 views



Comments powered by CComment